
How To Do Pull-Ups For Complete Beginners
Are you struggling to learn pull-ups? Does it feel like every YouTube video and blog article out there is glazing over the process as if you’re already lean and athletic? If so, I’ve been there too and I’m here to help you out.
This article and the accompanying video will be all you need to learn how to do pull-ups from absolute beginner. I encourage you to read this from start to finish, watch the entire video as well, then implement everything you learned, step-by-step, with dedication and commitment.
If you do that? You will get the pull-up. You have my word.
Let’s start from the beginning…
Not too long ago, I posted a beginner calisthenics routine on YouTube and it included a brief look at the progressions for pull-ups. In a nutshell, the progressive exercises for pull-ups I included in that video were:
- bodyweight rows (under a dip station)
- pull-up negatives
- assisted pull-ups (with a fitness band)
The video ended up getting quite a lot of views. About two months after publishing it, I had over 200k views and hundreds of comments on it. And among all the comments, one question stood out among the rest because it was asked over and over:
Dude, are you Johnny Sins?
Wait… no, that’s not it. Sorry. Although that question was asked quite a bit, here’s the question I was actually referring to:
Can you please make a detailed pull-up tutorial?
When I saw this question pop up repeatedly in the comments section, I remembered that the pull-up is a complex movement that is (no pun intended) head and shoulders above all the other basic calisthenics exercises in terms of difficulty.
So I decided to help out my viewers and create what I hoped would be the most detailed pull-up tutorial available.
Here’s the end result.
Home Equipment For Pull-Ups
In order to follow this tutorial and make 100% certain you’ll be repping out pull-ups like a pro, you’ll need to invest into your home equipment. But don’t worry. This equipment is not only affordable, it will last you YEARS – even decades – if you take care of it, plus it can be used for all sorts of different exercises, not just pull-ups.
Dip Station
The first piece of equipment I recommend is a sturdy dip station, also known as “dip bars” or “parallel bars”, which you’ll use for bodyweight rows when learning pull-ups.
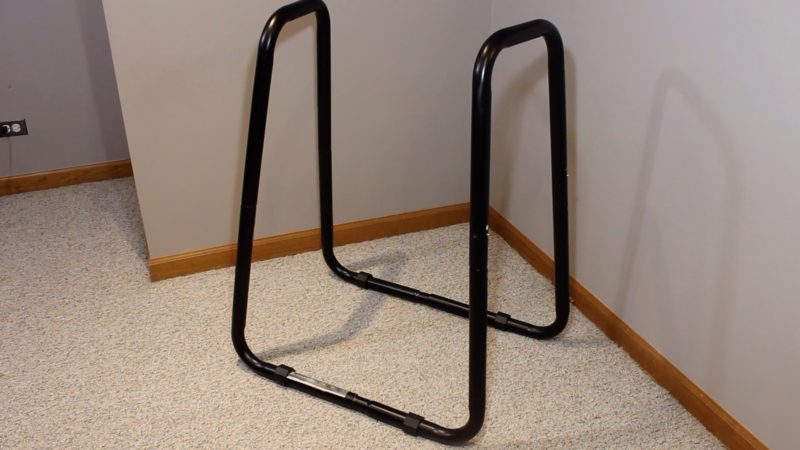
The dip station can also be used for dips (obviously), L-sits, inverted hangs, front-lever training and more.
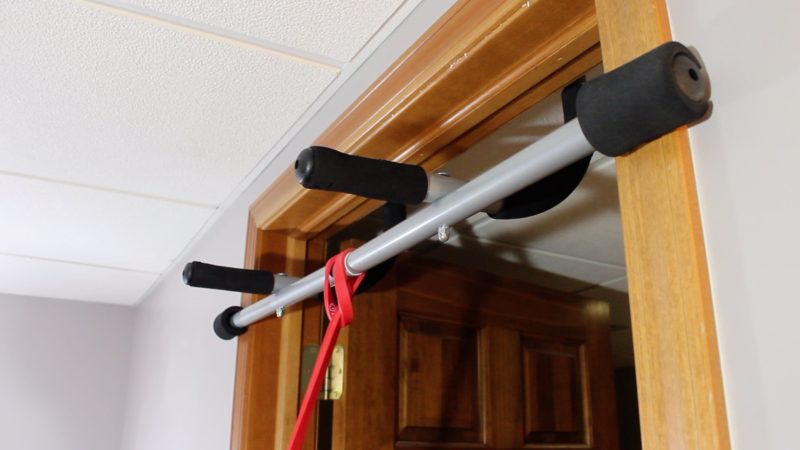
Doorway Pull-up Bar
I recommend a doorway pull-up bar if you’re just starting out because it’s most affordable and can be used on any standard doorframe.
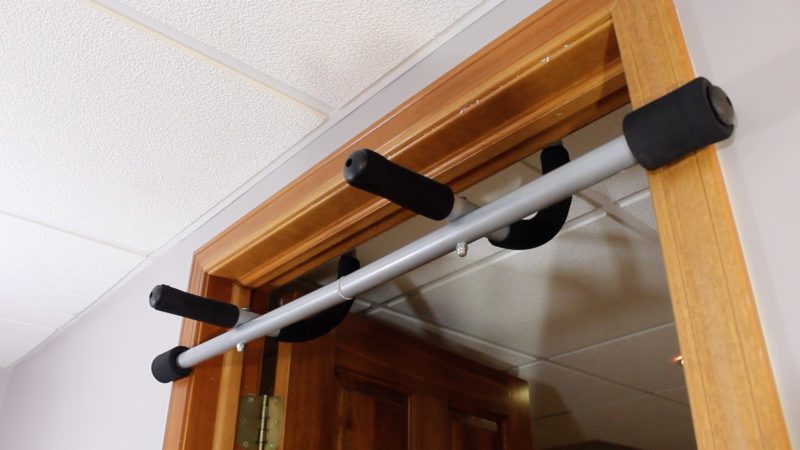
The one I’m recommending can also be used as push-up grips and as parallettes for other floor exercises, such as L-sits.
Fitness Bands
I also recommend getting yourself a good set of fitness bands, which can be used for providing resistance or assistance to many bodyweight exercises. These are great for learning pull-ups but will also be useful throughout your entire calisthenics journey.
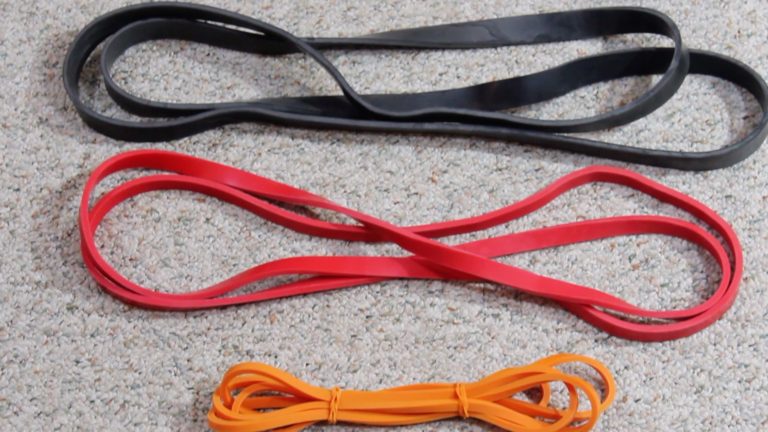
We’ll be using them to assist your pull-ups once you’re nearing the end of the progressions.
Pull-Up Progression Exercises
Note: If at any point you want to skip to the video version of these instructions, scroll to the bottom of this article where the video is embedded.
Like all complex movements in fitness, whether calisthenics or weight lifting, you want to take a progressive approach when learning the pull-up. This means working through a series of exercises where each one gets progressively harder and closer to your end goal.
With that said, let’s take a look at all the progressions I recommend using to achieve the pull-up. I’ll provide pictures, written instructions and target reps for each exercise.
Bent-Leg Bodyweight Rows
Start off sitting beneath your dip station. Grab onto the bars above and raise your hips up the floor. Your feet should be flat on the floor and legs bent to roughly 90 degrees at the knees.

Pull yourself up as high as you can by pulling your shoulder blades together (scapular retraction) while simultaneously bending at the elbows and pulling your arms backwards at the shoulder.

Doing this exercise with knees bent minimizes the resistance, making it an ideal horizontal pulling movement for beginners.
Target: achieve 10 reps in a set (while fresh) before advancing to the next progression.
Straight-Leg Bodyweight Rows
The next progression won’t require a whole lot of explanation because it’s very similar to the bent-leg version you just learned. You’ll want to straighten the legs out and perform bodyweight rows.

These straight-leg bodyweight rows are the most logical next step in building pulling strength because straightening the legs uses increased leverage to add resistance from your bodyweight.
Concentrate on keeping your core and legs tense so you don’t sag or slump at the hips while performing this movement. As before, retract your scapulae by pulling your shoulder blades together, while simultaneously bending at the elbows and pulling your arms back with the shoulders.
Target: achieve 10 reps (while fresh) before advancing to the next progression.
Active & Flexed-Arm Hangs
This next progression is actually two exercises, but I recommend doing them in tandem because they compliment each other.
Active Hang
First let’s look at the active hang. You’ll want to get beneath your doorway pull-up bar, make sure it’s nice and secure on the door frame, then hang on it with your feet on the floor.
Next, gently peel your feet off the floor by bending at the knees and raising your feet behind you.
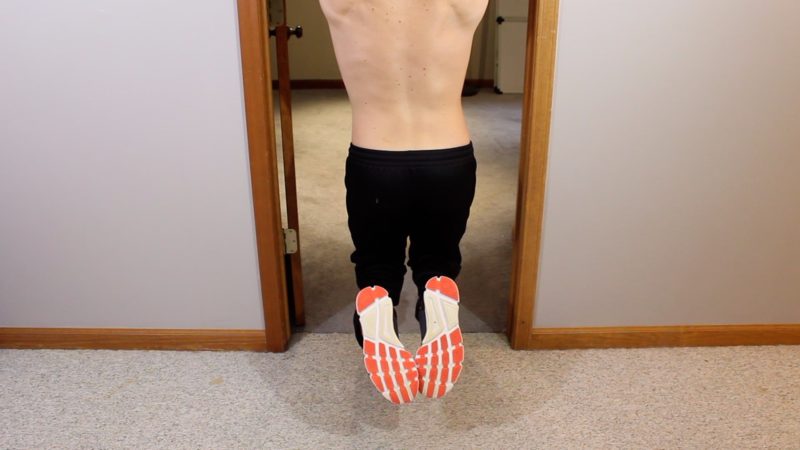
When performing this hang, you want to focus on retracting and depressing your scapulae. This means pulling your shoulder blades together (retraction) while also pulling downwards on your whole shoulder girdle (depression).
If you’re doing it right, there will be a space between your ears and shoulders as identified by the arrow in this image.
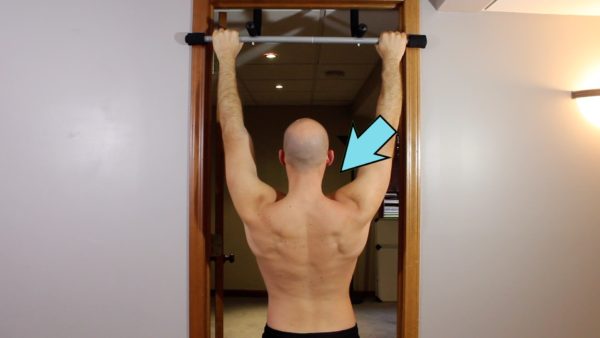
Retraction primarily comes from the rhomboids and trapezius, both of which are muscles in the upper back surrounding your shoulder blades. And the primary muscle group for scapular depression is the latissimus dorsi, which wraps around the side of the back.
Target: 10+ second holds in the active hang
Flexed-Arm Hang
While the active hang is an isometric contraction for the bottom position of the pull-up, this next exercise is the opposite of that; the isometric contraction for the top position.
Step on a small stool, chair, or any other platform that allows you to get your chin above your pull-up bar.
Grab the pull-up bar in whichever grip feels most comfortable to you, then carefully step your feet of the platform one-by-one and hold yourself in the top position of a pull-up with your chin above the bar for as long as possible.
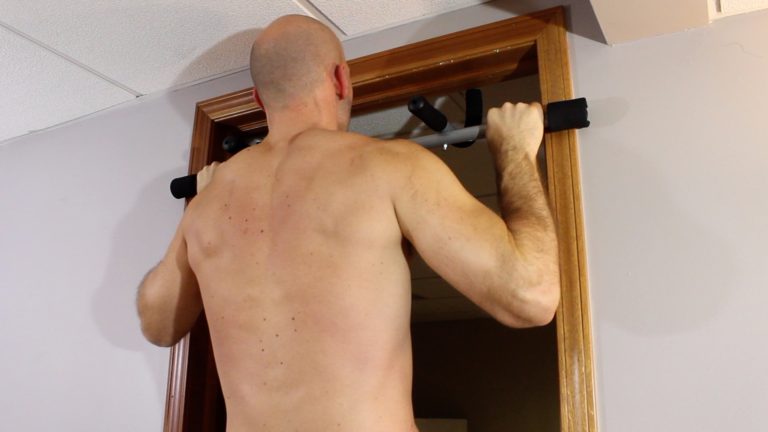
This will be extremely challenging at first, but work on it as often as you feel able to (I recommend at least three times per week) and you will quickly build strength.
Target: 10+ second holds in the flexed-arm hang
At this point, I recommend working both of the hangs (active and flexed-arm) in the first part of your training session, then including a few sets of straight-leg bodyweight rows at the end.
Pull-Up Negatives
Okay! Still with me? We’re almost there. Just two more progressions.
You know those two hangs you’ve been working on? The active and flexed-arm? Now it’s time to connect them with what’s called “negatives.”
When it comes to resistance training, a negative rep is the downward or eccentric (fancy word) phase of the exercise. The negative happens to be the phase of the movement that puts micro tears in muscle fibers and encourages growth and repair to make the muscles stronger. Hence, we include them as a progression.
So step up onto your chair or stool in front of your pull-up bar, get into a flexed-arm hang (which you can now hold for 10 seconds) and then lower yourself down to the floor as slowly as you can.

Once your arms are fully extended at the bottom of a pull-up, immediately step back onto the chair or stool, get into a flexed-arm hang and then repeat for another rep.
The goal here is to lower yourself down very slowly and in a controlled manner.
At first you might do somewhat quick and sloppy negatives. That’s expected. But keep at it and you’ll build strength. Before you know it, your negatives will be slow and controlled like a pro.
Target: 5 very slow, controlled negatives in one set
Assisted Pull-Ups
You’re so close! Last progression!
Remember those fitness bands you bought? Now you’re going to use them.
Wrap one of the fitness bands around the top of your pull-up bar. Then, feed one side of the fitness band through itself and pull it taught. This will create a loop you can step your feet into for assistance with pull-ups.
I recommend starting with a medium/light resistance band and seeing how it feels. As long as you can pull yourself up for one rep or more, it’s a good amount of assistance to use. Perform pull-ups with your feet in the assistance band loop. It’s okay if you can only do 1 or 2 reps at first. You’ll build strength. Perform multiple sets per training session, ideally 4-6 sets.

Target: 10 reps with your lightest assistance band
And at this point, once you get 10 assisted pull-ups? Try doing pull-ups without the band 🙂
Pull-Ups!
Finally! After all your hard work, you squeeze out that first real pull-up. No assistance band. Just pure, raw strength, pulling up your own bodyweight.

You get your chin over the bar. You lower back down to the starting position. You feel triumph.
And then? You celebrate!
Seriously, once you achieve the pull-up, it’s worthy of patting yourself on the back, treating yourself to something nice and celebrating your achievement.
And then? When the celebration’s over?
Time to get back to work! Because if you get 1 rep? Great! Do as many sets of one rep as you can in each session, until…
You get 2 reps. Then turn that into 3 reps. And 4 reps, 5 reps, 6 reps…
And eventually, you’ll be busting out sets of ten or more pull-ups, and you’re no longer a beginner at that point.
Let Me Take You Beyond Pull-Ups
Once you’re able to do pull-ups, you’re not a beginner anymore.
At that point, I encourage you to check out my other articles and my YouTube channel for more information on calisthenics-based fitness and healthy eating.
You can start branching out into intermediate calisthenics skills by learning the L-sit and handstand, both of which I have detailed video tutorials for on my channel. And once you achieve those skills? It opens a lot of doors for more advancement with calisthenics.
Prefer to learn by watching a video? Check out my detailed Pull-Up tutorial on YouTube. Happy training!
Share This Story, Choose Your Platform!